
728x90
책 내용의 인증에 관한 너무 많은 설정 때문에 주제만 참고하고 혼자 GPT 및 레퍼런스 참조를 통해 구축하기 함docker desktop으로 노드 구성
책에서는 node를 minikube로 구성했지만 나는 간단하게 docker desktop으로 구성했다.
- docker desktop에 Settings > Kubernetes 항목에 Enable Kubernetes 만 체크하고 적용하면 된다.
- 추가적으로 마운트를 위해 Resources > File Sharing에 경로를 추가하여 사용하면 된다.
Jupyterhub 란
쉽게 말해 데이터 사이언스, 데이터 분석, AI 등의 활용할 수 있는 멀티 유저 서버
주요 특징
- 멀티 유저 지원
- 쉬운 접근성
- 플러그인 통합
JupyterHub의 manifest 구성
Ingress 같은 경우는 사용하지 않았다.
Deployment
- 아래 내용에서 나는 자체적으로 Dockerfile을 통해 이미지를 만들었다.
- 그리고
ipynb및py파일을 사용하기 위해 바인드 마운트를 사용하였다.volumes영역에 내 로컬에서 마운트할 경로를 지정한다.volumeMounts에 컨테이너 내부에 마운트될 경로를 지정한다.
apiVersion: apps/v1
kind: Deployment
metadata:
  name: jupyterhub
  labels:
    app: jupyterhub
spec:
  replicas: 1
  selector:
    matchLabels:
      app: jupyterhub
  template:
    metadata:
      labels:
        app: jupyterhub
    spec:
      containers:
      - name: jupyterhub
        image: asdfg0237/cjph:18  # 기본 JupyterHub 이미지 사용
        imagePullPolicy: Always
        ports:
        - containerPort: 8000
        volumeMounts:
        - name: data-volume
          mountPath: /home/cor05321 # 컨테이너 내에서 경로
      volumes:
      - name: data-volume
        hostPath:
          path: /Users/jeong-yong-won/yongwon/toy_pjt/mlops-self-coding/jupyter/data
type: DirectoryDockerfile
- 컴파일러, 라이브러 설치 및 Python 개발 패키지 설치
- Python 패키지 설치
- JupyterHub 설정 파일 설정
- JAVA 설치
- Spark 활용을 위해 필요함
FROM jupyterhub/jupyterhub:latest

# 필요한 컴파일러, 라이브러리 및 Python 개발 패키지 설치
RUN apt-get update && apt-get install -y \
    build-essential \
    crossbuild-essential-arm64 \
    python3-dev \
    && apt-get clean \
    && rm -rf /var/lib/apt/lists/*

# Python 패키지 설치
COPY requirements.txt /tmp/requirements.txt
RUN pip install --no-cache-dir -r /tmp/requirements.txt

# JupyterHub 설정 파일 복사
COPY ./local-vol/jupyterhub_config.py /srv/jupyterhub/jupyterhub_config.py

# 기존의 Java 11 설치 부분을 JDK 8로 변경
RUN apt-get update && \
    apt-get install -y openjdk-8-jdk && \
    apt-get clean;

# JAVA_HOME 설정
ENV JAVA_HOME /usr/lib/jvm/java-8-openjdk-amd64requirements.txt
- 다 필요하진 않지만 책에 내용을 참고하다보니 추가하였습니다.
jupyterhub
jupyterhub-kubespawner
oauthenticator
jupyterhub-dummyauthenticator
jupyter_core
jupyter_server
jupyterlab
pyspark
scikit-learn
joblib
watermark
mlflow
category-encoders
boto3
matplotlib
mlflow_utilsjupyterhub_config.py
- 나는 gitlab oauth 를 통해 인증을 처리하였다.
- github, google 다 가능하다.
client_id 와 client_secret는 gitlab의 User Settings > Applications 에서 발급받을 수 있다.oauth_callback_url같은 경우는 jupyterhub의 domain +/hub/oauth_callback로 oauth 인증 처리 이후 경로를 적어주면 된다.- 참고로 난
hosts에 cozy.jph를 로컬 ip로 추가하였다.
- 참고로 난
- 또한
oauth_callback_url은 gitlab의 Applications > Your applications 에 적어줘야한다.
from oauthenticator.gitlab import LocalGitLabOAuthenticator

# GitLab OAuth 설정
c.JupyterHub.authenticator_class = LocalGitLabOAuthenticator
c.LocalGitLabOAuthenticator.oauth_callback_url = 'http://cozy.jph:30080/hub/oauth_callback'
c.LocalGitLabOAuthenticator.client_id = '{gitlab client id}'
c.LocalGitLabOAuthenticator.client_secret = '{gitlab client secret}'
c.LocalGitLabOAuthenticator.create_system_users = True


# 사용자 화이트리스트 설정
c.Authenticator.whitelist = {'{사용할 id}'}
# 처음 접근시 default path
c.Spawner.default_url = '/lab'Service
- Service의 Manifest는 아래와 같다.
- port: 클라이언트가 서비스에 접근하기 위해 사용하는 포트입니다.
- targetPort: 서비스로부터 트래픽을 받을 Pod 내부의 포트입니다.
- nodePort: 클러스터 외부에서 접근할 수 있는 포트로, 클러스터 내 모든 노드에서 이 포트로 접근할 수 있습니다.
apiVersion: v1
kind: Service
metadata:
  name: jupyterhub
spec:
  type: NodePort
  ports:
  - port: 8000
    targetPort: 8000
    nodePort: 30080
  selector:
app: jupyterhubManifest를 배포하자
- Manifest 내용을 전부 jupyterHub.yaml에 작성하였다.
kubectl apply -f jupyterhub.yaml배포한 pod 의 상태를 확인해보자
kubectl get pods- 정상적으로 배포되었다면 아래와 같이 나올 것이다.
NAME                            READY   STATUS    RESTARTS   AGE
jupyterhub-6966f9c76-hvqrr 1/1 Running 0 9h- 서비스 정보도 확인해보자
svc는 서비스의 약어이고/뒤에 서비스 명을 붙이면 확인할 수 있다.
kubectl get svc/jupyterhub- 서비스도 아래와 같이 나올 것이다.
NAME         TYPE       CLUSTER-IP      EXTERNAL-IP   PORT(S)          AGE
jupyterhub NodePort 10.106.211.72 <none> 8000:30080/TCP 13h- 그리고
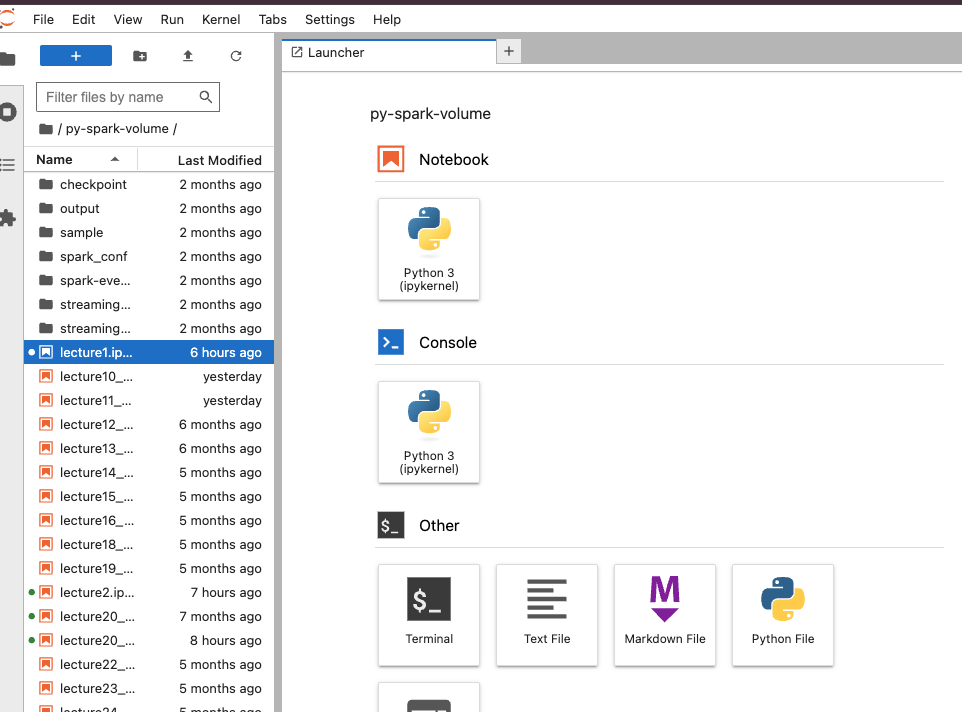
http://cozy.jph:30080/로 접근하면 gitlab의 oauth 인증 처리 후 아래 화면 처럼 이용 가능하다.
728x90
'Engineering > K8S' 카테고리의 다른 글
| Pod와, ReplicaSet 그리고 Deployment (0) | 2024.11.26 |
|---|---|
| Kubernetes 자주 사용하는 명령어 (0) | 2024.11.26 |
| [쿠버네티스로 구현하는 머신러닝]4-2 쿠버네티스에 ODH 오퍼레이터 설치 (0) | 2024.04.07 |
| [쿠버네티스로 구현하는 머신러닝]4-1 머신러닝 플랫폼의 구조 (1) | 2024.03.30 |
| [쿠버네티스로 구현하는 머신러닝]3.2-로컬 쿠버네티스 환경 설정하기 (0) | 2024.03.28 |